Small updates to help you beam new clients aboard

Whether in preparation for the next stages of Making Tax Digital or as a result of your marketing strategy, you may find that you’re adding more clients to your FreeAgent Dashboard these days. We’ve made some small changes to this process to save you time and make adding a new client even easier.
Complete the account setup process in fewer steps
When you want to add a new client, you first need to complete the required fields in your dashboard and then fill out some additional details in the client’s newly created account. We’ve added a new button to this workflow that allows you to choose whether to continue into the client’s account directly or go back to your dashboard and complete the final steps at a later time.

Review outstanding tasks
If you decide to fill out the additional details in the client’s newly created account at a later time, the overview page will highlight some outstanding actions for you to take. These include creating capital asset types, adding the client’s bank account details and setting up their opening balances.

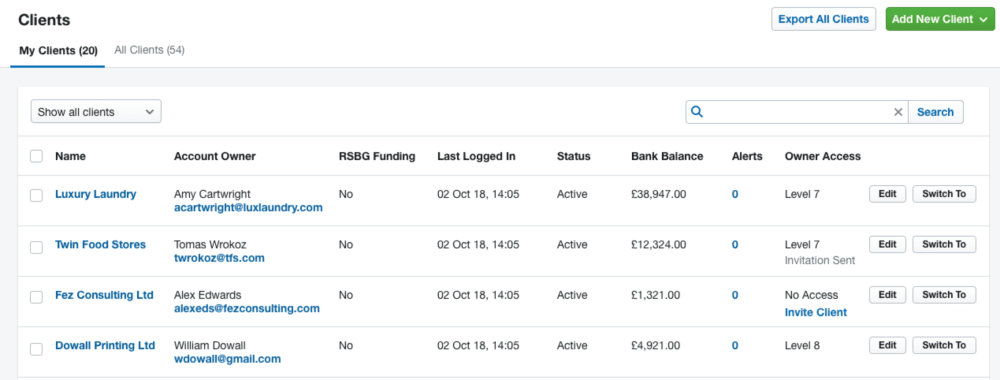
We’ve also added notices to the client overview page in your dashboard to let you know whether the selected client has been sent an invitation to create a password for their new FreeAgent account. You can then choose to send an invitation to the client directly from the notice.

See additional client details at a glance
Lastly, we’ve added a new column to the client list in the ‘My Clients’ area of your dashboard. The ‘Owner Access’ column gives you a clearer view of each user’s access level and whether or not they’ve been sent an invitation to access their FreeAgent account. You can invite any clients that have yet to receive an invitation without having to navigate away from the ‘My Clients’ area.

If you’re a senior account manager, you’ll also see this new column in the ‘All Clients’ area.
To find out more about the process of adding a new client, visit our Knowledge Base.